Pastissets de moniato (traditional Christmas sweet potato pastries)

The humble sweet potato is transformed into a lusciously dense filling and baked in semi-circles of short aniseed pastry to make these traditional Christmas treats. I love them.  The quantity of sweet potato here makes enough filling for about 60 pastissets, which sounds like a lot, but you don’t need to make them all at once as the mixture will keep perfectly well in the fridge for weeks. Iaia tends to make batches of 20-25 pastissets every few days over the Christmas period (which lasts until the 6th of January here in Spain), so the pastry recipe here is for about that quantity. Repeat as necessary!

What you need for the filling:filling ingredients
2 kg peeled, cooked white sweet potato
1.125 kg sugar
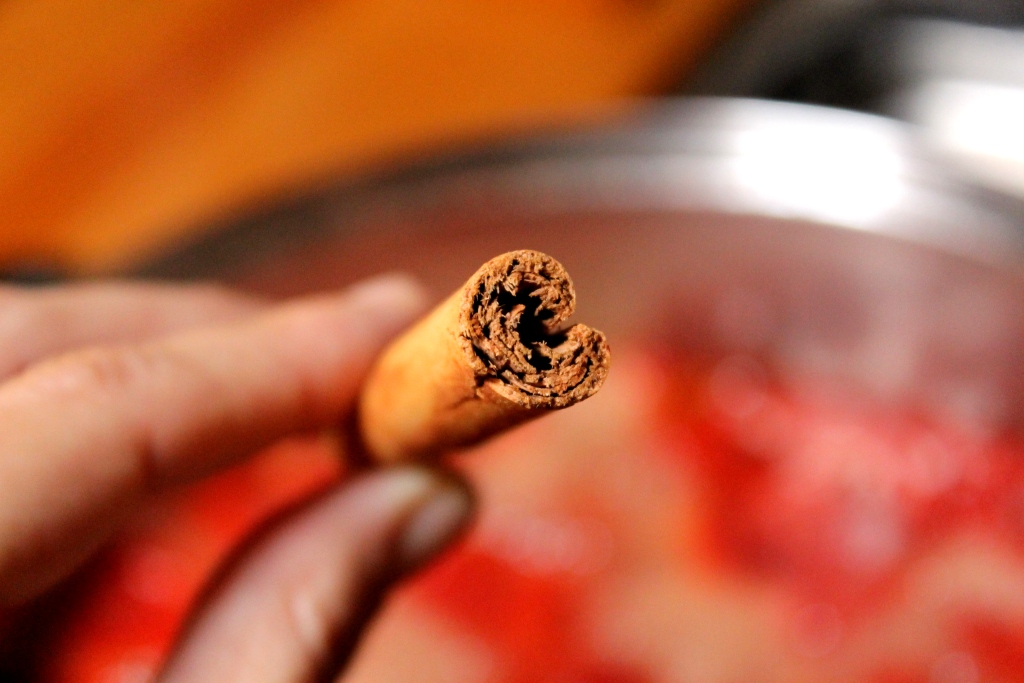
a long stick of cinnamon
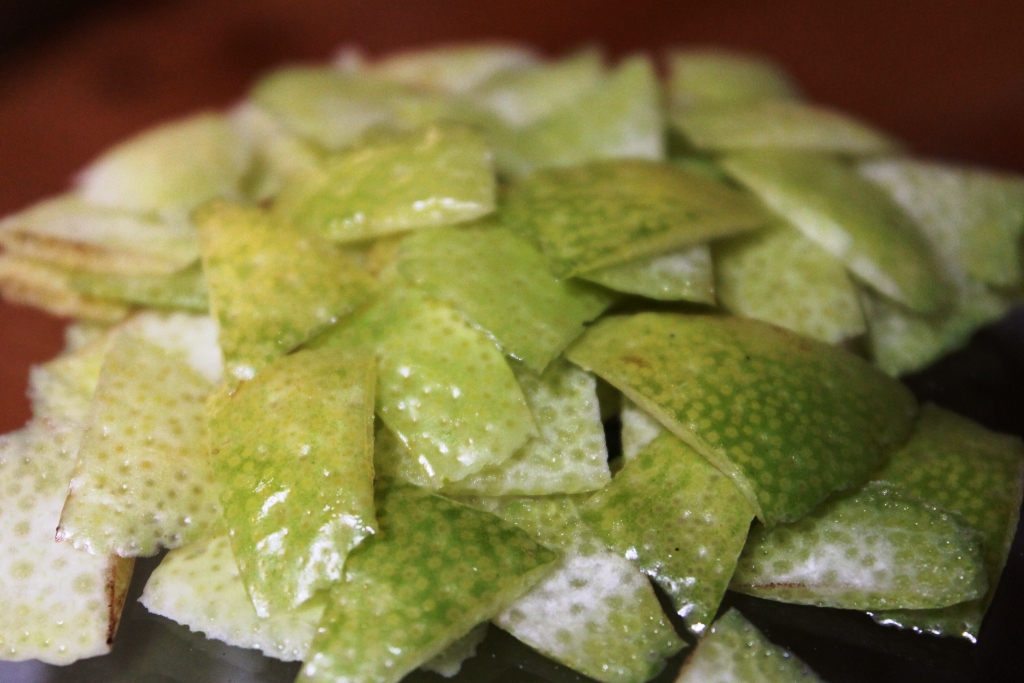
the peel of a large lemon

Making the filling:
Traditionally this recipe calls for 2 hours of stirring a large pot of hot, sugary potato without stopping at all. The risk of it catching and burning is enough to root you to the spot and make you sweat. However, Iaia has discovered that it can be cooked in the oven with only a minimum of stirring and fuss. Which is a jolly good thing. So…oven on to 170ºC.
Your sweet potato should be boiledmash
and then smooshed with a fork while it’s still piping hot so that you get a good, smooth mash. Weigh it mashed to make sure you have 2 kg, then set it aside while you deal with the sugar.
In Spain, we often cook in large, cheap, shallow terracotta bowls which can be set over a flame and in the oven. If you can get your hands on one, do! Otherwise, any shallow, flame and oven-proof dish will do.stirring
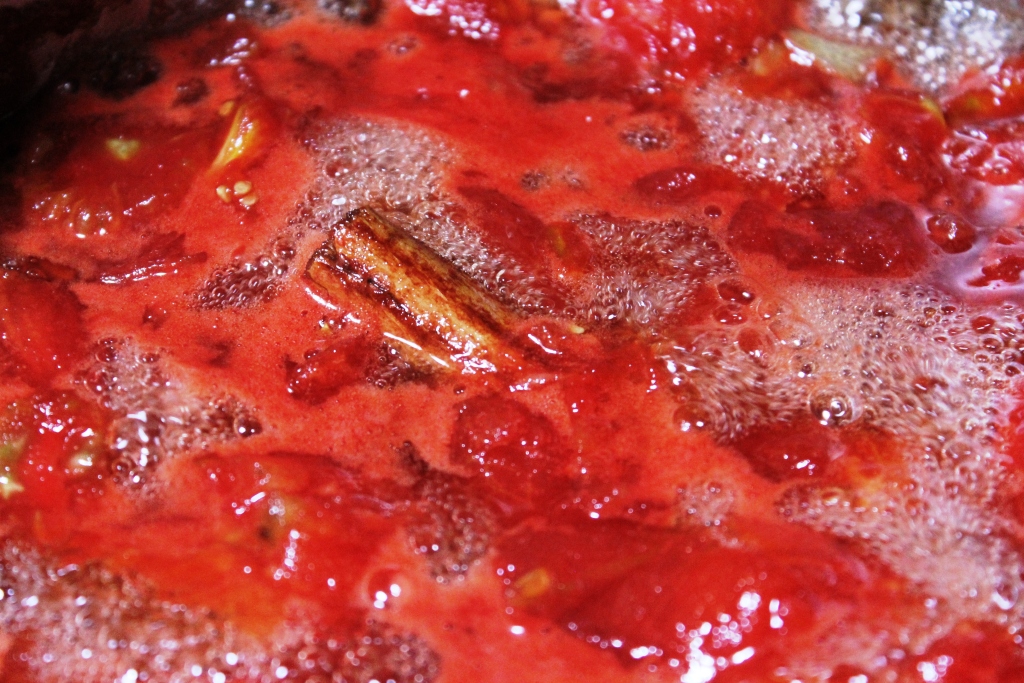
Place the sugar in the dish over a gentle flame. Break your cinnamon stick/s into the sugar along with the pieces of lemon peel. Start moving the sugar around with a wooden spoon gently and continuously. The idea is to get the sugar to the point where it is starting to melt without letting it burn at all. You will notice it becomes slightly moist IMG_6727after 10 or 15 minutes of low heat; if you think you need it, sprinkle a few drops of water in to help it along.
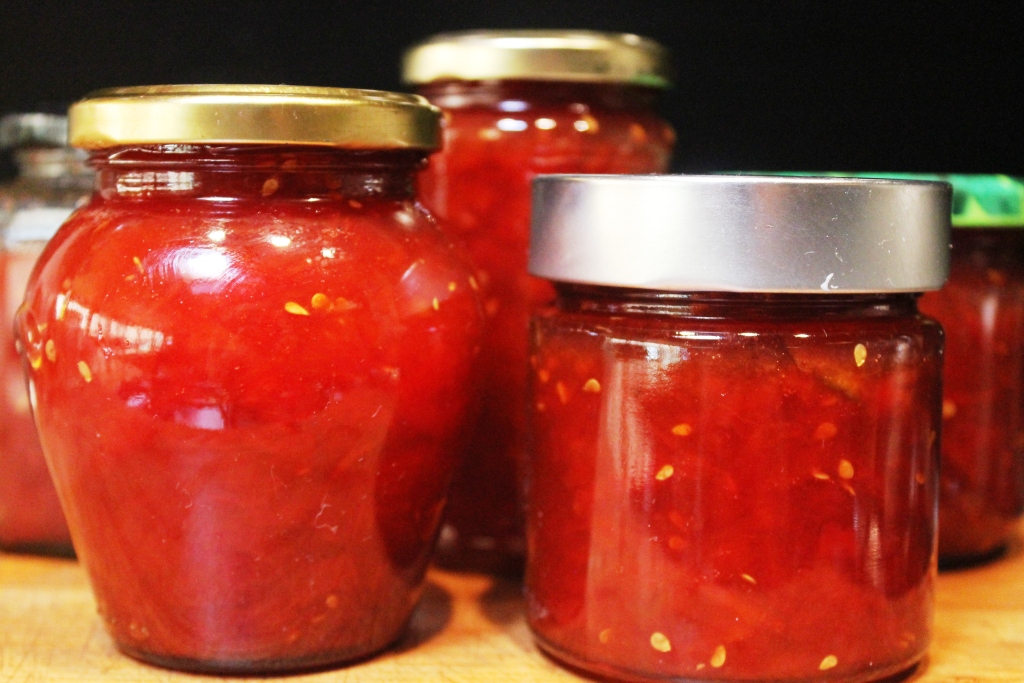
At this point, you can take the dish off the heat and start to stir in your mashed sweet potato until you get a smooth, homogenous mixture. This is what you will put in the oven for almost 2 hours or until it has turned a deep golden colour. Check every 20-30 minutes and stir if you see the top becoming a little toasted.
Remove and set aside until you are ready to make the pastry.totty

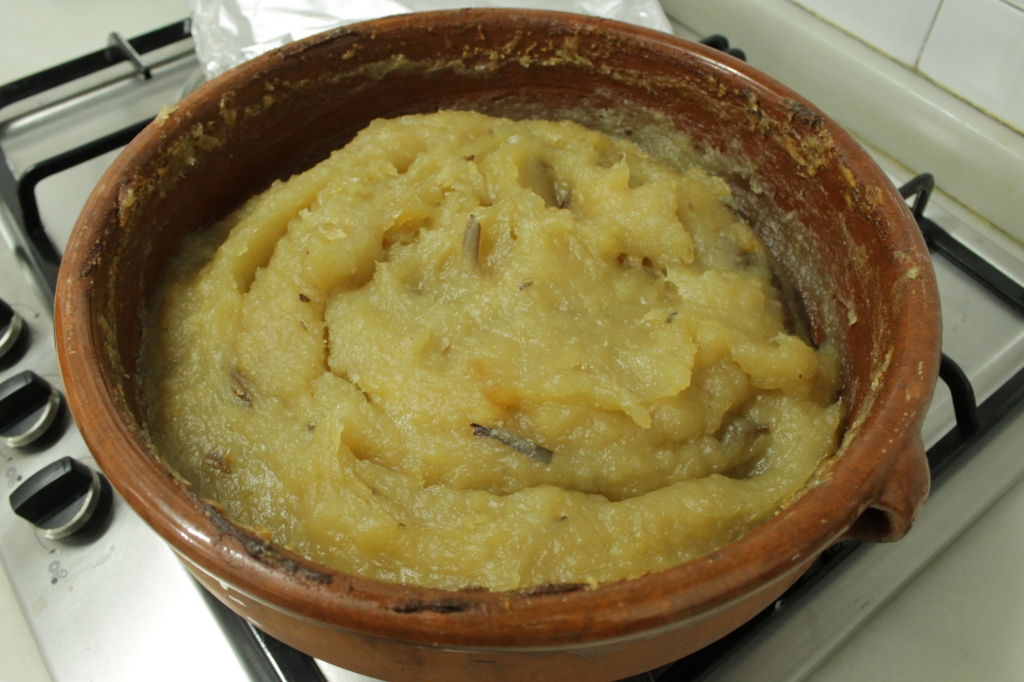
What you need for the pastry:
1 glass of sugar
1 glass of casalla (dry aniseed liqueur)
1½ glasses of sunflower oil
plain flour (as much as you need to make a short pastry)
Making the pastry and pastissets: IMG_6790
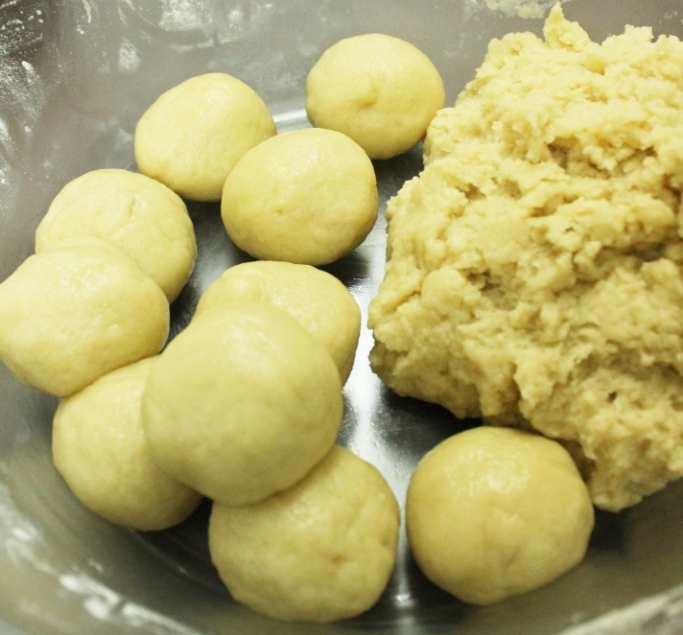
Mix the liquids together and then add flour bit by bit, mixing by hand until you get a nice dough, which is still quite damp, but not sticky. You ought to be able to make lovely smooth little balls of the stuff – roughly 50g of dough per ball. Once you’ve done that, let it sit for a good half an hour before proceeding with the rolling and folding…

Roll each ball out into a circle and place a good spoonful of sweet potato filling onto one side. Fold the dough over the filling to make a semicircle, then use a pastry cutter to tidy the edges. Lay on a baking tray and continue until you have used up all the dough. pastissetsBake for 15-20 minutes at 180ºC or until golden. Take out of the oven and allow to cool completely before scoffing most gloriously. Merry Christmas!IMG_6814

Gazpachos Manchegos

IMG_6797Gazpachos Manchegos is a delicious, wintery stew cooked with game (usually quail and rabbit) and bread-like tortas. It is the pride of Castilla La Mancha and a traditional dish for shepherds, hunters and farmers. Although the original recipe calls for two large flatbreads, one to be crumbled into the stew and the other to be used to spoon it out of the pan and into one’s mouth, our family does a Valencian version which uses little biscuits that require bowls and conventional cutlery. We also use organic chicken instead of quail and a little less rabbit than a real hunter would.
One of the most important parts of this dish is the picadillo – a mortar and pestle mash of cooked chicken liver, garlic, almonds, peanuts and parsley. Be brave!

What you need:ingredients
2kg organic chicken on the bone
Half a rabbit (approx. 1/2 kg)
3-4 ripe pear tomatoes
2-3 onions, finely chopped
1 head of garlic
3-4 dried sausages
1/2 kg meatballs (see putxero for mix)
4 packets of tortas (180g/packet)
pebrella (thymus piperella)
sweet paprika
2-3 small dried chillies
2-3 bay leaves
olive oil
water
salt
for the picadillo:
the organic chicken liver, fried
a handful of almonds and roast peanuts
2 cloves of garlic
a bunch of parsley

What you do:
The meat should be on the bone and cut into smallish pieces, as you can see in the photo. Grate the tomatoes, finely chop the onions and chop the sausages into small pieces.  Pour a generous amount of olive oil into a large, deep pan and start by frying the meat, together with the full head of garlic, until the meat is beautifully browned and well on the way to being cooked. Season lightly.IMG_6492Remove the fried liver and set aside for the picadillo, then chuck in the onion to soften. After about 5 minutes, add the tomato and fry gently, stirring everything around from time to time.  You should have your water handy at this point because the next step is to add the paprika, and you must never let it cook for too long as it will go bitter. So, put a good heaped teaspoon of paprika in, stir it for 30 seconds and then pour in your water. How much? Nobody can answer me. They say, “judge with your eyes,” so here is a photo:IMG_6515Throw in the bay leaves and a little more salt, and bring slowly to a boil. Organic chicken takes a lot longer to cook than the mushy-fleshed variety but is worth every minute, so let things boil comfortably for 20-30 minutes, adding hot water if it seems to be evaporating too quickly. Once the cauldron is bubbling, add the pebrella and pop the chillies in a tea strainer so that you can lift them out before things get too hot.IMG_6523Meanwhile, you need to get on with the picadillo, by smooshing up the ingredients in a mortar and pestle until it resembles a sort of rough paté:IMG_6534This is then spooned into the boiling mixture at the same time as the meatballs are plopped in. Stir everything gently and test the stock for flavour, seasoning as you see fit.
Then it’s time to add the “pasta”. Crush lightly with your hands as you pour the packets in. Then allow to boil for another 15 minutes or so.IMG_6551As the biscuits absorb the liquid, your gazpachos will thicken into a fabulously flavoursome, gravy-laden stew which ought to be spooned into bowls and eaten after it has been allowed to cool slightly. The second bowl is always the best!IMG_6566Serve with: a full-bodied red.

Sardinà: salt cured fish with peppers, onions and egg

Every year our town has its local “fiesta” at the beginning of September. One of the traditional events is a big sardinà brunch served to whoever turns up by a gang of well-dressed, starboard-leaning ladies.  We prefer to eschew the multitude and have our own small-scale celebration with a few friends instead. This year was a beautiful autumn morning, and Oscar was the most excellent chef.
What you need:ingredients1 salt-cured sardine per person
a few dried “capellà” (trisopterus minutus, or “poor cod”)
1 egg per person
3-4 onions
10-12 Italian peppers (green)
1-2 heads of garlic
oil
grapes and bread to serve

What you do:
First of all, get a fire going and let it reduce it to glowing coals. This is for the poor cod, which needs to be lightly charred just before you serve it.  Prep your veg by cutting the peppers into halves or large chunks, separate the individual cloves of garlic but don’t peel them and roughly chop the onions.
Put a generous slug of oil into a large frying pan (we used a paella pan) and heat. Fry the peppers and garlic until softened and beautifully coloured – this will take a little while, so be patient and keep the beer coming for the cook.cookingTransfer the peppers and garlic to a large serving plate. In the same oil, you are now going to soften the onion. Again, patience and lots of pushing about with the tongs to avoid bitter burning. Once that’s done, you have to lay the sardines in the pan and give them a few minutes on each side.  Put the sardines and onions onto another serving plate and let your oil heat up to egg-frying pitch. I’m pretty sure you will know how to fry an egg, but I will say that here they like to sort of flick the hot oil over the top of the egg instead of flipping it; the white bubbles and gets slightly crusty, and the flavours that have infused the oil do wonders for the humble huevo.
The poor cod should be put on the coals at about the same time as you fry the eggs – it only needs a minute or two on either side. You might need an extra pair of hands to deal with simultaneous frying and charring.servedNow all you need to do is fill a plate with a bit of everything and pour some cold beer!

Serve with: grapes (which are at their best in September), bread and beer

Arros al forn d’estiu (summer baked rice)

The story goes that when my husband Oscar was a boy, the family would pack a carload of towels, sun shades, chairs, cousins, food and drink and head off to the beach for the whole day. Iaia would always take along a whole, tea-towel-wrapped, ceramic dish of Summer Baked Rice, especially for her eldest son, and he would come rushing out of the sea to demolish the whole lot by himself, washing it down with chocolate milk. It is still one of his favourite lunches!

The amounts here feed between three and four people. If you don’t have a ceramic dish, use a metal baking tray, but increase the amount of water slightly so that it is exactly double the amount of rice.

The black pudding sausage is optional!

What you need:ingredients
2 glasses (roughly 400g) Spanish rice
1/2 glass of olive oil
a whole head of garlic
three or four ripe tomatoes
a handful of flat green beans
a good-sized potato
150g white beans
a black-pudding sausage (botifarra)
parsley
1 tsp sweet paprika
saffron/orange food colouring
water

What you do:
Pop the oven on at 200ºC and prep by measuring out your rice and oil, grating one of your tomatoes, slicing the potatoes, breaking the beans into pieces and putting your water on to boil. The amount of water is directly dependent on the amount of rice you use and the type of dish you cook in. If using a metal tray, use two glasses of water for every glass of rice. For ceramic dishes, hold back half a glass or so of liquid. For this particular recipe, I used 750ml of water for 400g of rice.prepped stuffPICADILLOYou will also need to make what we call a “picadillo”, which is a bashed-up clove of garlic with a small bunch of parsley and a bit of oil added. I use a mortar and pestle, but finely chopping is good too. Set this aside for a moment while you get on with the frying and assembling.

Place the rice into the bottom of your ceramic (or metal) dish and gently shake it so it settles evenly over the base.

Now pour the half-glass of oil into a frying pan and get the heat on. Place the whole garlic head in the oil for a quick, oil-flavouring fry. Once it has been on for a few minutes, drop it into the saucepan with your water and let it simmer gently while you prepare everything else, this will help ensure that the cloves are all cooked through by the time you come to eat them.FRYINGIn the same oil, lightly fry your sliced potatoes. Remove and place over the rice, distributing the pieces evenly. Gently fry your green beans and when they look bright green and slick, add the grated tomato and white beans. Fry for a minute or two longer, then in goes the paprika for a quick swirl. Remove from the heat and pour over the potatoes and rice, spreading things evenly over the whole dish. Slice the remaining tomatoes thickly and place them on top of the other ingredients. Nestle the head of garlic in the middle and (optionally) place the sausage right next to it. Spoon your “picadillo” over everything. Sprinkle a bit of food colouring on top to get the Spanish yellow that people here prefer to white when it comes to rice.ASSEMBLEDNow, hopefully, you will still have the right amount of water in your saucepan, and it will be boiling hot. If it looks as though some of it has evaporated, add a little. It’s important that the water be boiling when you add it to the dish so that the rice starts cooking immediately; otherwise, you might get a gluggy mess. So, carefully pour the hot water over your rice and slip it straight into your oven. Bake until the water has all been absorbed; depending on how hot your oven really is, this should take between 25 – 40 minutes.COOKEDLet the rice cool for a few minutes before tucking in, or I promise you will burn the bejesus out of your mouth.

PLATEDServe with: sweet raw onion slices go beautifully on top, cold chocolate milk is a must for beach-goers, while at-homers could try a fresh young red.

Spanish Omelette (aka potato omelette)

Spanish Omelette in Spain means potato omelette, with or without onion. Everyone has their own secrets for making one of the most fantastic omelettes ever, and discussions can get quite heated when it comes to whose is the best! Iaia always uses onion and can turn out a perfect tortilla with her eyes closed. I still need to keep mine open, especially with the flipping.
This dish is incredibly versatile as it can be consumed hot or cold, served as an appetiser, a main meal, a snack, in a roll, on a plate, in bite-sized squares on toothpicks, with tomato, with mayonnaise, with salad, at a picnic, a dinner party, as part of a buffet…need I go on?
The recipe here is for a large dinner-plate-sized omelette which will provide a good slice for 6-8 people. I used a stainless steel frying pan as it’s the only large pan I have, but I highly recommend using a non-stick pan instead.

What you need:ingredients
3 potatoes
1 onion
6 eggs
olive oil
salt
a non-stick frying pan

What you do:
Chop the potato and onion into chunky pieces, as you see above. Heat a generous amount of olive oil so that nothing sticks or burns (you can always drain any excess off before adding the eggs), and gently fry the onions for a minute or two before adding the potatoes. Iaia insists on covering the potatoes as they cook so that their edges become sort of fuzzy instead of sharp. This helps the egg stick to the totties later and gives you a much more attractive finish without any air holes between the potato and egg.process1Beat your eggs in a large bowl and add a good pinch of salt. Once the vegetables are cooked, but not falling to pieces, use a slotted spoon to transfer them to the egg bowl.  Drain any excess oil from the frying pan, but remember you will need a healthy coating to stop any sticking (even in a non-stick pan). Once the pan is well heated again, pour the whole egg and vegetable mix in and move it gently around (without disturbing the edges) so that the omelette cooks evenly, but take care not to turn it into scrambled egg. You can cover a very thick omelette to help with the cooking but don’t walk away!
After a little while, you will have a browned bottom and edge, and curd-like centre. It is time to flip (for photos of this see the Spinach Omelette recipe).  Take your pan off the heat and cover it with a plate. Wrap a tea towel over the top and base of the pan to avoid burning yourself, and grip firmly from either side. Flip with conviction, so the omelette flops out onto your plate in one piece. Put your pan back on the heat and slide your now raw-side-down omelette back into the pan to finish cooking. I like to use a spatula to tuck the edges under a little because it gives a lovely rounded edge; this is especially important if you are cooking a larger omelette.
The trick is now to cook the omelette to the ideal point – neither runny nor rubbery. Practice will show you what it feels like to the touch when it is ready.  Turn out onto a plate and allow to cool (or not!) before eating.finished

Tomato jam

Our tomato plants are giving us a bumper crop this year –raw the gorgeous plummy fruit is coming thick and fast.  What better way to conserve it than in this luscious, sweet jam.  Iaia makes pots every year, but I have pipped her at the post with a small batch for you!
A kilo and a half of toms made almost 5 jam jars full of ruby peeledred yumminess. The cinnamon and lemon are optional. Iaia leaves her cinnamon in and pots shards of it up with the jam, but I hate finding little barky bits on my toast or between my teeth, so I pull it out at the last minute. The lemon gives you a lovely tangy surprise from time to time, and I really recommend including it!lemon zest

What you need:
At least a couple of kilos of plum tomatoes
A kilo or so of sugar
Zest of one lemoncinnamon
A cinnamon stick

What you do:
Scald and peel all of the tomatoes. Weigh the lot and put them into a large, heavy-based, non-reactive pan. Run a knife IMG_3277through them to break them up a bit before weighing your sugar and adding it to the tomatoes.   Traditionally the recipe calls for equal weights of tomato and sugar, but both Iaia and I find that far too sweet. For this batch, I used a kilo of sugar for 1600g of tomatoes, and the jam set well and is sufficiently sweet without cloying.
The sugar will immediately start to draw the liquid out of the tomatoes, so you can turn on the heat and stir things gently without fear of boilingburning.  While the tomatoes are heating and the sugar is melting, use a potato peeler to zest the lemon and cut the strips into smallish pieces. Add to the pan along with the cinnamon stick and bring everything to a jolly boil.  I allowed this lot to boil hard until it was reduced by about half, then poured it into sterilised jarsjars.

Serve with: breakfast toast and a cuppa or as part of one of our favourite summer canapés: a slice of tangy goat’s cheese with a dollop of jam and an anchovy sat on top.erving suggestion

Fresh tuna and sweetly softened onion

A rare and special treat, this tuna dish is one of my absolute favourites.  Buy the freshest, reddest, most beautiful tuna steaks you can find and eat at room temperature or cooler, ooping the oil off the plate with lovely soft fresh bread.  Mmmm.

What you need:ingedients
Finger-thick tuna steaks
seasoned flour
3-4 onions
olive oil

What you do:
Chop the tuna into large chunks and pop them into a plastic bag with the seasoned flour. Shake things up until the fish is evenly coated. Heat a couple of tablespoons of olive oil in a heavy-bottomed frying pan and brown the floured fish on both sides. Don’t overcook, or it will go dry on you – best to err on the undercooked side.  Take the browned fish out of the pan and set it aside while you deal with the onions. Slice them reasonably finely and fry them gently in the oil you used for the fish (add some if necessary). You don’t want to caramelise them, but you do want them to be cooked through –  Iaia tells me the onion has to be “atabollaeta“, but when I asked her what that meant, she shrugged and said, “you know…done just to the right point”. Hm. Inspection of a dictionary provides “ripe coloured” in reference to fruit, so I suppose in this oniony context, it means soft and gently coloured.  That works for me, anyway!processSo, once the onions are atabollaetes, turn the heat off and send the tuna back into the pan with the onions to mingle for a while. We like this at room temperature, or even cold from the fridge.

IMG_3248Serve with: bread and a chilly white – summer essentials!

Cuttlefish, tomato and “pebrella”

Fresh cuttlefish pre-cleaning

One of Oscar’s favourite mixes for stuffing into a brunch roll or ooping onto great crusty lumps of bread is this cuttlefish, tomato and pebrella mix.  This last is a herb found locally. Its grown-up name is Thymus Piperella, and if you search online, you might find a supplier – it has a really distinctive flavour, and although oregano could be used as an alternative, it hasn’t got the same special kick.
For the fishy part, I dragged Iaia along to the Valencia markets yesterday to help me choose the best critters and then she walked me through the recipe step by step. It’s best to buy fresh (oh-so-ugly) cuttlefish and get your friendly fishmonger to do all the cleaning for you. You will probably still have to cut off the tough wings and pull out a beak or two, but the worst part will have been dealt with by abler hands (than mine, at least). Oh, and stand back when you put the cuttlefish into the pan – it spits!

What you need:ingredients
3 medium-sized cuttlefish
a healthy kilo of pear tomatoes
2 onions
olive oil
black pepper
pebrella (thymus piperella)
dried chillies

What you do:
Chop the onions and cuttlefish into smallish pieces. Grate the tomato and put some oil in a deep pan to heat.  The cuttlefish is the first to go in as it takes quite a while to cook.  It spits horribly when it hits the oil, so be really careful!  Let it sizzle gently for about 15 minutes before adding the onion to fry and soften for another 10 minutes or so. processPour in the tomato, add some salt, the herbs and the chillies (Iaia uses a tea strainer to be able to fish them out before it gets too hot) and let everything bubble away quietly for about an hour, or until you see the tomato losing most of its wateriness and becoming thick – like a really great pasta sauce. Remember to test for flavour and remove the chillies when you notice a bit of heat.

Take off the heat and allow it to cool completely before serving. We like to leave it overnight and put spoonfuls into a crusty roll for brunch.

finishedServe with: Cold white wine and lots of bread.

Crema de carabasseta (courgette soup)

The first time we decided to grow courgettes, we planted about 8 little seedlings, then watched in awe as they took over the whole vegetable patch and started sprouting dozens and dozens of courgettes.  I battered courgette flowers, made courgette soups, baked courgette cakes, grilled courgettes, roasted courgettes, spaghettified courgettes, used courgettes on pizzas and still had leftover fruit to give away to friends and family. It was a veritable courgette-fest! However, one can only really enjoy so much of a good thing, and so we have limited ourselves to 2 plants per year since then.
One of Iaia’s favourite courgette dishes – this soup –  is also one of her easiest and most flexible.  I make it here with the basic ingredients but you can add any number of things – almonds, cheese, cream, leek, potato…whatever takes your fancy.  A kilo-and-a-half courgette gives you about 2 litres of soup.  Any monster marrows (above 2kg) should be peeled; their skin becomes pumpkin-like and doesn’t break down in cooking.

What you need:ingedients
1½ kg courgette(s)
1 onion
1-2 cloves of garlic
olive oil
half a glass of water
salt

What you do:
Put a few tablespoons of olive oil into a processheavy-bottomed saucepan and heat gently. Roughly chop the courgette, onion and garlic, and chuck in the pan. Stir everything so it gets a light coating of oil, and add the water to stop anything from catching.  Salt lightly and cover tightly.  Allow to steam/fry/boil for about half an hour, or until the vegetables are all cooked through.  While still hot, blend (I use a stick blender, but a conventional blender will give you a smoother soup).  You can serve this soup hot or cold – it’s lovely either way!

finished

Serve with: bread, cheese, a dollop of cream or sour cream…

Gazpacho andaluz

Summer gluts of tomato mean two things around here – cold Andalusian gazpacho and pots of thick tomato jam.  Today I am making the first of these for our supper.  This is very much a Iaia version rather than a faithful reproduction of the traditional soup – I would love to hear your own recipes, especially if you are reading from down south!
We like to drink our gazpacho from glasses and so add some ice-cold water to get the consistency just right. If, on the other hand, you eat yours from a bowl, it’s usual to add a handful of finely chopped pepper, onion, tomato and/or croutons.  The recipe here gives you about a litre of soup.

What you need:ingredients
1½ kg ripe plum tomatoes
a chunk of cucumber
a small green or red pepper
half an onion
a clove or two of garlic
olive oil
your favourite vinegar
a pinch of salt
water (optional)

What you do:
blenderPeel the tomatoes using whichever method you prefer – I use a sharp knife and do away with the whole boiling water palaver. Chop into chunks along with all the other ingredients and toss into a blender. (Note: we also peel the cucumber to save sensitive tummies from indigestion).
Once all the veg is in the blender, pour in a happy glug of olive oil, a generous splash of vinegar and a perfect pinch of salt (all of which you can tweak to taste as you blend), and press the “on” button.  Add water if it seems too thick, more salt if it seems too bland and more oil or vinegar if you think you need either – this is not rocket science.
Refrigerate until ready to serve. Easy? Delicious!

finished

Serve with: croutons, bits of chopped ingredients, and a summer table full of nibbles…