Coca de carabassa de La Borrassa (pumpkin sponge)

Pumpkin is not considered a savoury ingredient here and is never served as such. More often than not, the sweet round fruit is cut in half and roasted in a moderate oven for a couple of hours until caramelly and soft.  Slices are then taken as if from a pie and eaten with a spoon for dessert. The cooked flesh is also incorporated into many typical sweets such as buñuelos (fried doughnut-style balls), or sponge cake.
This recipe comes from a neighbour of Iaia’s who is commonly referred to as La Borrassa. The intricate system of hereditary nicknaming that is an integral part of the small rural township here in Valencia never ceases to amaze (and amuse) me. This particular woman’s moniker comes from the fact that her surname is Borras. The “a” at the end denotes the fact that she is a female Borras.  But it is not always that simple. I have heard conversations that (loosely translated) run something like this:

“Did you hear what happened to Rosa?”
“Which Rosa?”
“Um, you know Carmen the Duck (daughter of Pedro the Drake), whose sister married Joe the Monkey (son of John the Monkey)?”
“Do you mean the Duck who used to live next door to Harry Bread and Oil’s mum?”
“Yes, that’s her. Well, The Duck’s cousin, Rita the Crying Woman, is Rosa’s older sister.”
“Ah. So Rosa is the younger Crying Woman! Now I know who you mean. Her husband is Man’s Head the plumber!”…

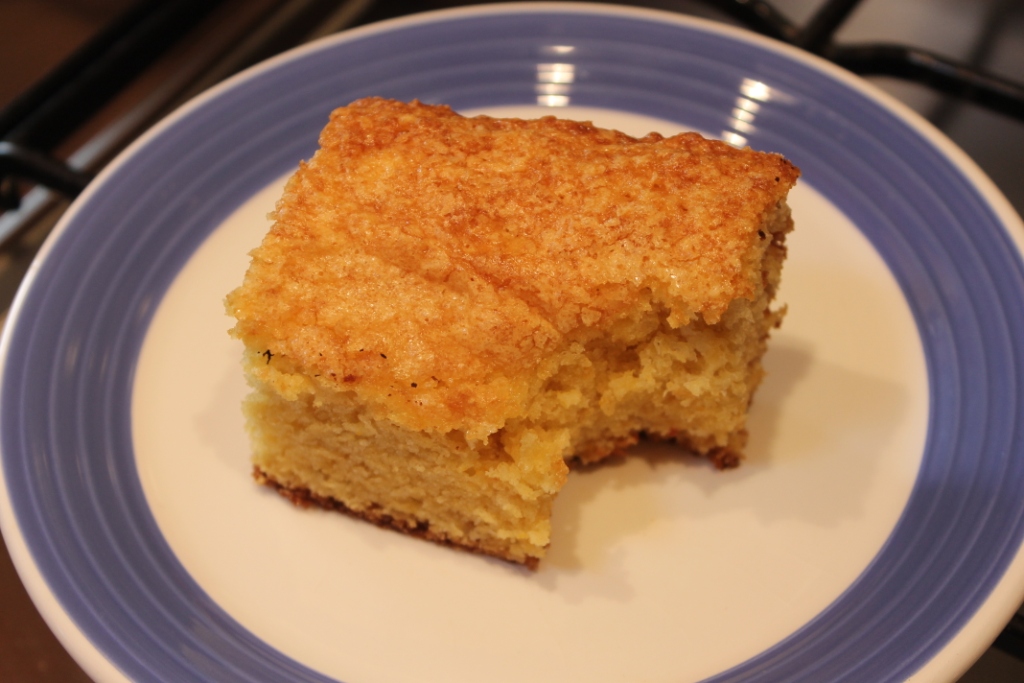
 Yes, well, in any case, here is the recipe for La Borrassa’s Pumpkin Sponge. Quantities are for a 37 x 25 cm baking tray, so fiddle them to suit your tin.

What you need:ingredients
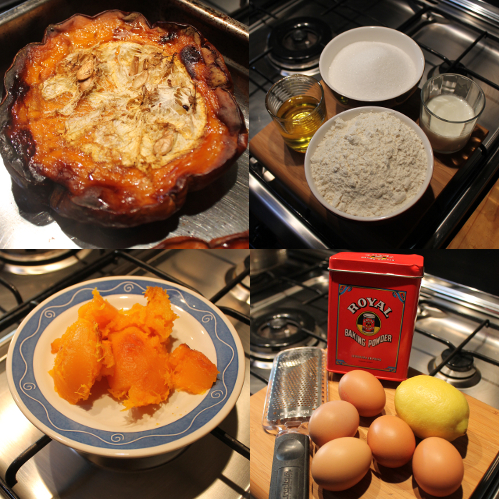
250g roast pumpkin flesh
500g sugar
5 eggs, separated
400g plain flour
100ml sunflower oil
100ml milk
zest of 1 lemon
2 sachets (32g) baking powder

What you do:
Pre-heat your oven to 180ºC and line your baking tray/cake tin with parchment.  Mix the egg yolks and sugar together, then mash in the pumpkin. I use a fork and stop when I see the sugar starting to liquefy. Whisk in the oil and milk, then gradually sift in the flour and baking powder, mixing thoroughly between each addition. Stir in your lemon zest, then whip up your egg whites until soft peaks form before folding them into the mix too. Don’t over-mix at this stage, or you will squash all the air out, and your cake will not be as springy and spongy as it should.

Pour the batter into your prepared tin and cook for at least half an hour, testing with a skewer once this time is up. Don’t be tempted to open the oven before the 30-minute mark or your sponge will collapse. Allow to cool in the tin…if you can bear the wait.

IMG_9417

Spinach omelette

Oscar and I work in the evenings and often don’t get home before 10 pm during the week. With only a bit of fruit between lunch and then, dinner is always a bit of a desperate affair, often involving bits of cheese, salami, avocado…in short, anything that doesn’t require cooking and can be shoved quickly into a roll or forked hastily into a hungry mouth.
Pre-cooking an omelette and leaving it to cool while we are at work means that we have something more substantial to accompany our bread, and one of our favourites is Iaia’s IMG_9399spinach omelette, to which she usually adds ajos tiernos (spring-garlic). As I find the ajos a little strong for late evening supper, I prefer to use a small clove of normal garlic to flavour the gorgeously convoluted dark green leaves. I know this recipe is simple, but it is one of Iaia’s staples, so it really can’t be left out!

What you need:ingredients
3 eggs
a small bunch of spinach
a clove of garlic
salt, nutmeg
olive oil

What you do:
Wash your spinach carefully and chop it roughly. Wilt in a non-stick frying pan – the water from washing will be enough, no need to add any – then leave to drain in a colander while you get the eggs and garlic ready.  I like to microplane my garlic rather than slice it, but if you prefer little slivers, by all means, slice away.  Once peeled and prepped, gently fry your garlic in about a tbsp of olive oil; make sure you don’t burn it, or it will be horribly bitter.
Add the cooked spinach and continue to fry until there is hardly any wateriness left.frying Remove from the heat. Beat your three eggs in a medium-sized bowl, adding salt and a little nutmeg or any other seasoning you fancy. Put your spinach into the same egg bowl and stir until thoroughly mixed.
Get your pan good and hot, and coat it with a little oil. Pour your egg and spinach mix in. If the mix is very deep in the pan (ie. you have a small pan), you will need to gently push it around (without disturbing the edges) so that the omelette cooks evenly, but take care not to turn it into scrambled egg. preflipAfter a few minutes, you will have a browned bottom and edge with a curd-like centre. It is time to flip.  Take your pan off the heat and cover it with a plate. Wrap a tea towel over the top and base of the pan to avoid burning yourself, and grip firmly from either side. Flip everything over with conviction so that the omelette flops out onto your plate in one piece. Put your pan back on the heat and slide your now raw-side-down omelette back into the pan to finish cooking. I like to use a spatula to tuck the edges under a little because it gives a lovely rounded finish, which is especially important if you are cooking a larger omelette. flippingHeat off. Omelette out. Eat hot, or leave to cool for a delicious roll filling.

IMG_9395

Iaia’s braised lamb shanks

I’ve got exams starting next Monday, so this week’s cooking is all about minimum time investment for maximum flavour.  Iaia’s lamb shanks fit the bill perfectly and are what we had for lunch today. It’s true, they do require slow cooking, but you can pop them on the stove and forget about them for a couple of hours while you do something else (like study). Once cooked, they can be left off the heat in the pan to develop their flavour for hours, or even overnight. A quick reheat is all that’s needed before serving.

What you need for two people:
two lamb shanksingredients (get the butcher to nick them like these ones here, so they cook evenly)
a head of garlic
2 well-sized onions
a large potato
salt, pepper and any herbs you fancy
a generous half glass of white wine
the same of water
a couple of tbsp of olive oil
a spoonful or so of flour

What you do:
Season your flour generously with salt and pepper, then lightly dust your lamb with the mixture. Heat the oil in a heavy-based (preferably oven-proof) saucepan or casserole dish and brown the lamb well.
While the meat is colouring, take the head of garlic apart but don’t peel the cloves, they will steam into a lovely mild pulp in their pink jackets. Peel the onions and cut them in half, then into slices (not too thinly, or they’ll burn).
When you think the meat is well browned, remove it from the pan and set aside while you toss the onion and garlic in the hot oil to soften without colouring. You will need to stir things about because you don’t want the onion colouring or burning. Adding a little salt to the onion will encourage it to release water and help avoid burning too.browningandbeddingPour the wine and water into the pan, settle the lamb shanks comfortably into their oniony bed, cover tightly, turn the heat down and leave everything to simmer quietly for a couple of hours. You may want to check the liquid levels every now and then, depending on how well your saucepan seals.
After about an hour and a half, peel and cut your potato into smallish pieces, dropping them around the lamb. Cover and simmer again until the totties are cooked through. Then switch everything off until about 20 minutes before you want to eat (or continue straight onto the next step).finishingWhile you are steaming any accompanying vegetables, finish the lamb off by putting it under the grill, making sure it isn’t too close to the heat source. This will brown the potatoes and give your melting meat a nice dark crusty exterior.

IMG_9379

Serve with: steamed greens

Paella

Ask anyone about Spanish food and it is pretty likely they will wax lyrical about paella.  It is a fantastic dish and even though we eat it just about every Sunday, I never grow tired of it.  Seasonal and regional varieties abound. Near the coast it is usually cooked with seafood but we live inland, so our typical ingredients include chicken, rabbit and locally produced vegetables.  In January, cauliflower is at its best, so we do a cauliflower, spring garlic and pork version. In March the broad beans are just tender little blips and mix beautifully with artichokes for our favourite spring paella.

The way paella is cooked varies slightly from town to Iaia's selection of paella panstown – even from house to house. For example, just a kilometre away from where we live, they fry the rice before adding the stock, something we never do.  The one thing that everyone agrees on is that you need a good, heavy caldero or paella dish like the ones pictured here, and plenty of experience to be able to produce a perfect paella, especially if you are cooking it over an open fire.
Some say that it is impossible to make a decent paella anywhere but here in Valencia (the local giant paella makers Galbis go so far as to take everything – even their own water – with them wherever they go to try to emulate the local flavour as closely as possible), but you can have a pretty good go and with a bit of practice will be enjoying a truly fabulous rice dish, even if it doesn’t taste exactly the same as what we have here.
Cooking over an open fire can be really IMG_1880tricky, even for seasoned paella cooks, so see if you can get your hands on one of these paella rings – they plug into a gas bottle and give really good control over the flames. For two people you might get away with cooking the paella in a large frying pan, but ideally you need a caldero.
Although serving paella on plates is perfectly acceptable it is more authentic to gather your chairs around and eat directly from the caldero. It’s fun as long as everyone follows the basic paella-eating rules:
Mentally divide the paella into pie-slices for each person. You are not allowed to eat from anyone else’s slice or break the barrier between your slice and the person next to you without permission. Interestingly, the size of this barrier is a pretty accurate indication of the relationship between neighbouring eaters. The smaller it is, the closer they are.
If there is something you don’t want in your slice, you can flick it gently into the centre with the handle end of your spoon (never the bowl).  Start eating from the edge and work your way inwards dragging the rice towards the rim with your spoon and squashing the spoonful flat against the inner wall of the pan to avoid dropping grains of rice all over the place.

Paella with cauliflower, pork and ajos tiernos

Oscar’s uncle Rafa is usually in charge of cooking Sunday lunch but today he was otherwise engaged so my father-in-law Eduardo took up the long-handled spoon.  It was unbelievably windy, so an open fire was out of the question. We huddled in the shed and cooked the paella over a gas flame. Not exactly picturesque but unbelievably good all the same! We used a kilo and a quarter of rice, enough for about 12-15 people. As Eduardo points out, the amount you cook depends on who is eating, how much people nibble beforehand and how much you want left over for later.  It is almost impossible to give accurate measurements for the ingredients, I have recorded what we used today but every paella will be slightly different.  The amount water is the hardest thing to get right and trial and error is an unavoidable part of becoming a proficient paella chef!
Cauliflower is at its best right now and the normal accompanying vegetable is what we call ajos tiernos. They are sort of like spring onions but in garlic. I have no idea if these are available outside Spain – spring onions and normal garlic are NOT the same and would not work here – best to just leave them out if you can’t find them.

What you need:

200ml olive oilingredients
1½kg  pork rib in bite-sized pieces
a bunch of ajos tiernos cut into 3cm lengths*
a medium-sized cauliflower broken into florets
4 pear tomatoes, grated (discard skin)
2 capsicums torn into pieces
1¼ kg rice
250g chickpeas, soaked and pre-boiled
sweet paprika
orange food colouring
salt
*you will have to add the pieces according to size so that the smaller pieces don’t burn. First the thickest white parts, then the thinner white parts and finally the green sections.


What you do:
Set the caldero on the gas rings and make sure it is level. Pour in the oil and heat.  Add pork and brown well. Lightly fry the capsicum until it softens slightly then remove and set aside. Season the meat. Add the thickest pieces of the ajos tiernos and fry for about 30 seconds. Follow with the smaller sections and then about 30 seconds later the thin green parts. Pop the cauliflower in and stir well to coat everything with a little oil. A long handled spoon or a pair of long tongs is essential for this if you are using a large caldero. fryingWhen everything is sizzling away nicely, add the tomato to deglaze the pan. Fry slightly then add a spoonful of sweet paprika. Stir and cook for about half a minute, taking care not to burn the spice. Now it’s time to put the first lot of water in. Pour it in until it reaches the screws on the side of the caldero. I think we put in about 2½ litres today, adding a little later after the first boil.  frying&waterIt’s a good idea to keep seasoning as you go – Eduardo says “better to add a little salt five times than a lot twice”. Check everything is comfortably under water and bring to the boil. This initial cooking period will soften the vegetables and tenderise the meat. It also gives the cook a chance to grab a beer and some olives or cheese!
Things should be looking pretty well cooked after 15 minutes or so boiling. That means it is time to get ready to add the rice. Top the water up to the screws again (when you stand a spoon up in the middle of the pan, the liquid should reach about half-way up the bowl – see the photo) and season with a little more salt. Add your food colouring, pop the chick peas in and give everything a final, gentle stir. Once you put the rice in you can just gently poke things into place, but any major spoon action is forbidden. Gently lay your fried capsicum pieces over the top of everything and then get the water boiling nicely again. Pour in the rice, making sure it is spread evenly around the pan.  Use a spoon to push and poke any visible grains under the water and off the vegetables but don’t stir! stockRice needs to dance as it cooks so that it doesn’t go all gluggy and sticky. Bring the water up to a steady, rolling boil. Try the stock for salt remembering that the flavours will become more concentrated as all the water evaporates.
The rice we use here takes about 20 minutes to cook through by which time all the liquid should have disappeared. You can’t add water after it’s started cooking so you need to control the flames carefully. If it looks as though there is too much water, turn up the heat. Too little water and you will need to turn the flames right down and, if necessary, cover everything with some tinfoil to let the steam help the rice cook through. If things go to plan, your rice should absorb all of the liquid and form a crusty, caramelised layer underneath. This is called socarrat and everyone will want some.
Once all the water has evaporated and your rice is cooked, take the pan off the heat and, if you can bear to wait, leave it to cool for about 10 minutes before serving onto plates or, Valencian style, eating directly from the pan. This last option requires special knowledge of paella-eating etiquette (see above).

paella

 Serve with: wine in winter, beer or icy sangría in summer…


Llentilles de la tia Toni (Auntie Toni’s lentils)

I hated lentils when I was a kid, but that was probably because my experience of them was limited to the goopy, mushy, boarding school variety that came with soggy toast for breakfast.
Years later, here in Valencia, I was served a plate of lentils that had been stewed with chorizo, pork trotter, ribs and root vegetables. It smelt so incredible that I couldn’t resist a taste, and the smoky, porky, gravy-laden little things, which had not (miraculously) turned to sludge, converted me instantly.
This is a far simpler but still absolutely delicious lentil recipe that Iaia’s sister Toni taught me years ago.  It is quick and ridiculously easy – no soaking or sautéing required. Just chuck all the raw ingredients in a saucepan, add water, and simmer for an hour or two.
If you leave out the ham bone, it is perfect for vegans, and of course, you can tweak the spices and/or vegetables to suit your own taste, or to use up anything lurking in your crisper (for us, it was broccoli today). Using vegetable, chicken or beef stock will provide a greater depth of flavour, but water works perfectly well on its own too.

 What you need for two hungry people:ingredients
150g little brown lentils (dry – no need to soak them first)
1 large onion
1 large carrot
1 or 2 cloves of garlic
a piece of Serrano (or other) ham bone
1 pear tomato
sweet paprika
any other spices you’d like to add
salt (remembering that Serrano ham is already pretty salty)
800 ml water (and/or stock if you have some)

What you do:
Finely chop the onion and carrot. Grate the tomato, discard the skins, and microplane or crush the garlic. Put everything into a cold saucepan over medium heat and bring it to a boil, then turn it down and leave it to simmer for a couple of hours. Check the pan from time to time to make sure nothing is sticking to the bottom.

 lentils

Serve with: bread and a red

Carxofes farcides (stuffed artichokes)

This would have to be my favourite artichoke recipe. Iaia and I cooked a double quanitity (24 artichokes) today for a family lunch, so don’t be put off by the sheer size of everything you see here.
To serve as a main course for four people, simply halve all of the ingredients and use a deep frying pan with a lid instead of the industrial saucepan you see here in the photos. The important thing is that the artichokes fit snugly in a single layer. And please, don’t skimp on the oil – there isn’t any other fat in the recipe, and you need to be generous to make sure it tastes fabulous!

What you need for the stuffing:
500g lean minced beefstuffing ingredients
500g minced pork
50g pine nuts
2 eggs, beaten
2 small slices of stale bread, soaked in…
…½ glass of milk
a good bunch of parsley, finely chopped
salt, pepper and ground nutmeg to taste

What you need for the gravy:
2 large onions, roughly choppedgravy veg
2 or 3 carrots, roughly chopped
4 or 5 pear tomatoes halved
6 cloves of garlic, peeled and halved
a small bunch of parsley
1 tbsp flour
1 tbsp sweet paprika
750ml of good chicken or vegetable stock
75g whole raw almonds
salt to tastevegetables

Other ingredients:
24 artichokes
250ml olive oil
8 hard-boiled eggs
4 more carrots
extra stock
a large bowl of acidulated water

What you need to do:
Prepping the stuffing: If you can manage it, stuffingit is best to make the stuffing mixture the day before you cook the dish itself. This will ensure that it has the perfect texture – not too dry, not too sloppy. Simply put all of the stuffing ingredients into a large bowl and mix well by hand. The mixture should feel a little loose at this stage. Cover with cling film and let rest in the fridge overnight.

Prepping the artichokes: Have your bowl of acidulated water to hand; you will have to plop the prepped chokes into it, so they don’t go all grey and ugly. Trim the tough outer leaves from the artichokes, cut off most of the stem and then trim any very green parts off the base. Slice off the green leaf tips and use your thumbs to open the artichoke slightly in preparation for the stuffing. Fiddling with artichokes will stain your finger brown, so you might want to wear gloves! When you have finished them all, turn them upside down onto a tea towel to drain a bit before you stuff them.artichokesNow it’s time to stuff your artichokes with however prepped artichokesmuch mince fits into each one. Once stuffed, you need to dip their tops in egg and fry them top down to seal the stuffing in.  Once the tops have browned, turn them on their sides and continue to fry them for a few minutes to start the cooking process, then remove them from the heat and set them aside for the moment. It’s a bit of a palaver, but once you get a rhythm going, you’ll be fine.
After stuffing, you will have some minced mixture left over. Roll into meatballs, coat in the remaining egg (as they have very little bread, we need the egg to bind them) and fry until golden. Remove and set aside.

Making the gravy:
Use the same pan and the same oil to lightly fry the raw almonds. stock vegWatch them closely and whip them out as soon as they get a blush of colour; if you leave them in, they will suddenly go dark and burn. We’ll be mixing them into the gravy later. For now, pop the parsley and garlic in and swizzle them around for a minute or so before adding the chopped onion, tomato and carrot. Fry all of this gently until the onion starts to soften. Before you add the stock, you need to fry the flour and paprika lightly. This will thicken and flavour the gravy beautifully. It’s also a good idea to remove the tomato skins at this point. Once that is done, pour in your stock. Iaia says that it is important not to put too much stock in, you can always add more, and this is gravy, not soup. You will have to judge the amount for yourself, but for this recipe, we used about 750ml at this point.  Cover the pan and simmer until the veggies are soft enough to go through the blender. When you think they are, pour everything into a blender (or use a stick blender), add the almonds, and whizz it all into a smooth gravy. Adjust seasoning to your taste.

Putting it all together:
With your pan off the heat, put the 4 bottom layerchopped carrots and meatballs on the base and arrange the artichokes carefully so that they all fit in one layer. The carrots and meatballs can be used to prop the artichokes up; you don’t want them rolling around and losing their insides.  Pour in your blended gravy and, if necessary, add a little stock, so the artichokes are about ¾ covered. Heat on, bring to a boil, then turn down to a simmer. Cover the pan and let things bubble gently for about half an hour, or until a skewer passes easily through the base of the largest artichoke. Slice your boiled eggs in half and place them over and around the artichokes to warm through, and there you have it. Stuffed artichokes in a yummy gravy!

carxofes farcides

Serve with: crusty bread for the essential oop and your favourite bubbly.

Arros d’hivern (winter rice)

Winter is never very long or arduous in Valencia but there are some days when the cold gets right into your bones and hot, nourishing soupy rice is the only thing that will warm you up.  This is one of the first things I learnt to cook here and one of my favourite rice dishes. It is also incredibly easy!

The cardet (cardoon in English) is delicious but it may be a bit hard to find. If you can’t manage to get your hands on any, just leave it out – there is no need (and no way) to substitute it.

What you need:

Two meaty pork ribs cut into pieces (650g)
A medium-sized swedeingredients
A stick of cardoon
Sweet paprika
One pear tomato
A jar of white beans
A bunch of spinach.
8 small handfuls of white rice (250g)
Enough water to cook the rice and still be soupy
Saffron or turmeric powder*
Olive oil
Salt (season as you go and to your own taste).

 *People have a strange aversion to white rice here. They love to see it coloured yellow. Saffron is bloody expensive and gets lost in this dish, so I usually use turmeric. Otherwise, just leave it white.

What you do:

Peel and chop the swede into bite-sized chunks.  Strip the cardoon of any leaves and if the stringy fibres are particularly thick, strip some off. Chop into mouth-friendly lengths. Slice the tomato in half and grate it onto a plate, discarding the skin. Wash the spinach thoroughly and chop or tear it a bit, so you don’t get giant leaves on your spoon when it comes to eating.
Pour enough oil into a large saucepan to coat the bottom and heat (if your pork is especially fatty, use less olive oil).
Pop the pork into the pan to brown; the browner it gets, the tastier the rice – but don’t burn it!
Put a generous pinch (or a small teaspoon) of sweet paprika into the pan and stir quickly so that it doesn’t stick and burn. After about 30 seconds, add the grated tomato and stir to deglaze the pan.
Pour in enough water to cover the pork, then add the swede and cardoon and top the water up so that everything is generously covered. Bring to a boil.
Cover the saucepan and turn the heat down. Simmer for at least two hours or until the swede and cardoon are cooked through (there are two factors to take into account here; one is that the bigger the pieces, the longer they will take to cook, and the second – and more important – factor is that the longer it simmers, the better the stock will be so no half-hour skimping!).
When the veggies are cooked** and you are ready to eat, check your seasoning and if you are happy with it, turn the heat back up to get a rolling boil before putting the rice in. Stir it around a bit and cover again, so as little stock as possible evaporates. About 10 minutes before the rice is cooked (read the packet – every rice is different, here it takes about 20 minutes to cook through), add the spinach and white beans and give everything a gentle stir.
Ladle into bowls and let sit for five minutes before eating. If you are lucky, you will get a sort of skin over the top, which is proof of a fantastic arros d’hivern!

finished dish

 Serve with: a full-bodied red to help warm those wintery cockles.

 **I usually make a double quantity and at this point, before putting the rice, spinach and beans, take out half the stock, pork and veggies to freeze for another day. It means you will have this delicious rice in just 20 minutes next time!